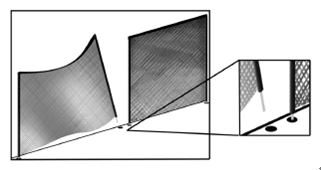
1 Marking Holes
Your fence comes with a hole template. Mark your entryway first with a pencil. The
entryway is a point where you want two sections to meet so you can unhook them from
one another and enter your fenced area.
If you purchased a hinged gate: proceed to the measurements section of this manual
for the gate and mark the gate holes first, then return to this section of the manual
and proceed with marking the fence holes.
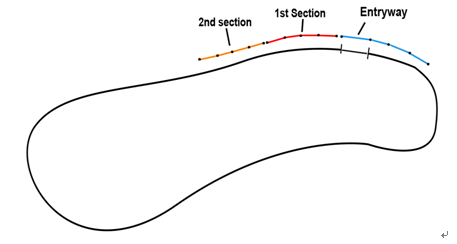
After marking the entryway, continue using the template to mark your fence both
directions from your entry way. You can change directions at every pole. After every
5th pole you will have two poles next to one another where you are starting a new
section.
IMPORTANT: Before marking holes check the distance from center hole to center hole
on the template using a tape measure to make sure you are choosing the correct holes
to use for your fence. Also check a section in the holes after drilling your first
two of holes:
- 36": 4' tall safety fence - pole to pole
- 30": 5' tall safety fence - pole to pole
- 2.5": Spacing between fence sections where two poles will be next to each other.
2 Using your drill guide
Holding the drill and positioning yourself for drilling
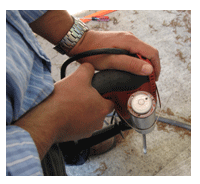
|
Grip the drill with two hands, one on the handle to pull the trigger and the other
to steady the top of the drill.
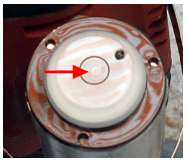
For straight runs position the bubble in the center of the circle.
For turns of the fence, stand outside the turn and face it. Lean the drill in towards
yourself until the bubble is either on the edge of the circle or centered on the
dot. The top of the pole should be leaning away from the turn.
|
|
|
|
|
If the fence is a straight run or only slight turns then position the bubble in
the center of the circle. Also use this setting for drilling the holes for gate
posts.
|
|
|
|
|
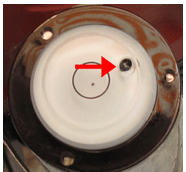
If the fence is changing direction by less than 90 degrees position the bubble so
it is centered on the line as shown in the picture. (The drilling should lean AWAY
from the turn)
|
|
|
|
|
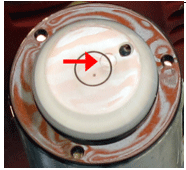
If the fence is changing direction by 90 degrees position the bubble so it is centered
on the outer dot. (The drilling should lean AWAY from the turn)
|
|
3 Erecting your gate
1. Plan where your gate will be. This should be marked out on the pool deck first,
and then the fence should be measured off in both directions. PLACEMENT TIP: Don't
put the gate on a corner, the effect the tension of the fence will have on the gate
may cause locking alignment issues. The gate works best in the middle of a straight
run of fence.
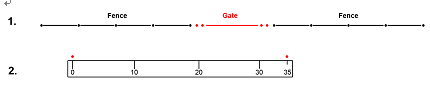
2. First lay out a tape measure and mark the two outside holes. The measurement
center hole to center hole is 35". MEASURING TIP: don't use the end of the tape
measure as the starting point for measuring, it is far more accurate to pick an
inch mark and measure 35" from that inch.
3. Measure in from both those marks towards the center of the gate 2 ½" and mark
the inside center holes.
4. Before drilling your gate holes, use your fence template to mark your first fence
poles off each side. These will be placed 2 ½" center hole of the outside gate post
to center hole of first fence pole (This is the same spacing as that used in between
fence sections).
5. Drill all four holes a zero degrees (no angle - center of the bubble level on
the drill guide)
6. You can place the hinges on either the left or right. Insert the two gate trusses
with the tall top plate on the latch side.
7. Attach your hinges and latch to the flat metal supports welded to the gate trusses.
The gate should swing out away from the enclosed pool area (if you are standing
outside your fenced area it should swing toward you).
8. Follow the directions provided with your Magna Latch kit for attaching and adjusting
your hinges and latch
9. If extra support is needed (recommended) there are two holes in the base flanges
of the trusses. (note: the base flanges are supposed to only be welded on one side)
Using 1/4" x 2 1/4" concrete wedge anchors purchased from a hardware store, use
those holes to bolt the trusses to the pool deck. Drill holes for anchors using
bit size recommended on anchor package.
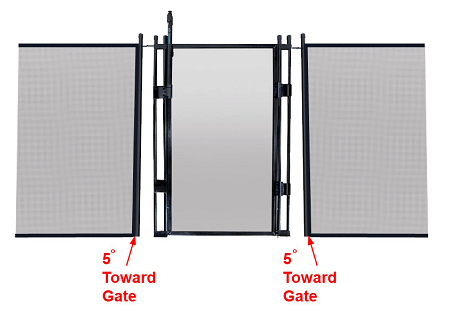
10. Angle the end poles of the adjacent fence sections toward the gate using the
mid circle point on your drill guide (used previously for slight turns) towards
the gate.
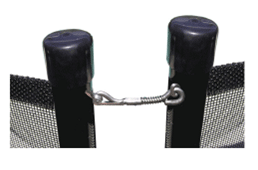
11. Using a 1/16 bit drill a hole in the outside pole of the frame to hook your
hook & eyes to the adjacent fence posts. This is just a pilot hole, the hook and
eye are designed to be self tapping. Attach the poles to the gate trusses using
the hook and eyes.

4 Drill the deck
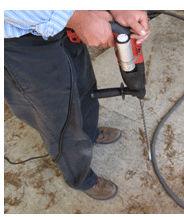
Drilling should be done using a 5/8 masonry drill bit and a rotary hammer drill.
Drill your hole at a depth of 4". It is best to mark your drill bit using electrical
tape at 4" from the bottom of the bit.
Many times when drilling 4" you will reach the bottom of the pool deck and reach
dirt. This is ok.
Drilling should only take a few seconds per hole however concrete decks are made
of different types of concrete in different areas of the country - drilling may
be slower if your concrete is harder. If drilling starts very slow from the beginning,
be sure your drill is set to rotary hammer; the action of the bit should
be spinning and pulsating up and down simultaneously.
If drilling slows do not use more pressure as this will not make it go faster; the
motion of a rotary hammer drill is not such that pressure will make a difference.
You may need a new drill bit if drilling slows.
If you hit rebar stop. You can purchase rebar drill bits that can cut through it.
Do not drill on joints - reposition the fence direction instead to skip over the
joint.
Wear protective gear at all times when drilling and keep children away from the drill.
When you finish a hole move the drill up and down in the hole a few times to clear
away concrete dust. You can also use a shop vacuum to help clear concrete dust.
Procedure for drilling using the drilling guide:
1. Before starting: practice holding the drill at the different angles a few times
and even try a few test runs in dirt to get a feel for what the drill feel like
when in motion.
2. Line up the tip of the drill bit on the center of the mark for the hole.
3. Find the correct position on the bubble level that you desire from the previous
page.
4. Drill for approximately 5 seconds and stop. During drilling the bubble will shake
around; when you stop check that your bubble is settled on the correct position.
5. After confirming position resume drilling. Continue this starting and stopping
a 3-4 times while drilling your hole to be sure your angle is still correct.
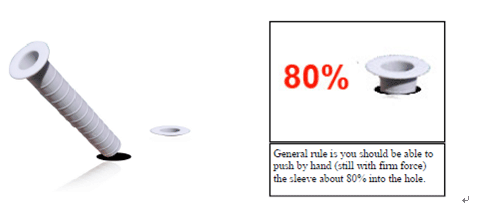
5 Insert the plastic sleeves
Every hole should have a plastic sleeve inserted into it.
Important: The sleeve should be tight in the hole however you should be able to
push the sleeve about 80 percent of the way into the hole pushing down with the
heel of your palm and tap with a blunt object like a mallet the remaining way in.
If you cannot, do not force the sleeve. Pull it back out and using your drill run
the bit up and down the hole putting slight pressure on the side walls of the hole.
Then try reinserting the sleeve.
If you force the sleeve the pole will also be tight and make it more difficult to
be removable.
Next stand your fence upright in the holes with sleeves in them. When you are first
installing the fence expect there to be tension to reach from base of pole to base
of pole. Tension at the top of the poles however is not achieved until after the
sections of fence are fully attached to one another by hook and eyes.
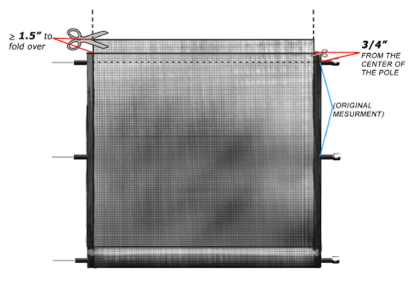
6 Modify the fence to correct lengths (If Needed)
1. Drill your last hole where you need it.
2. Measure from the last hole to second last hole; center hole to center hole.
3. Remove the backing by unscrewing the screws on the back of the pole using a screwdriver.
4. Measure on the mesh the same measurement you measured on the ground Add a 3/4"
then cut the lining; then measure 1.5" or more of mesh and cut.
5. Lay the pole centered on the original measurement. The extra lining should go
past the pole.
6. Fold the extra mesh and re-attach the backing. Cut off any extra mesh to clean
up the look of the fence.
7 Latch Fence
If you are making a complete circle with your fence just use the hook and eye to
create tension by screwing the two hooks to both poles.
The hole in the pole is between the first and second screw from the top.